Wednesday, September 5, 2012

New Glue-up

New project, aspen and mahogany, currently in the clamps.


Was glued with TiteBond red, tomorrow I'll pull the clamps off.


Until then it'll sit there on my DeWalt DW744 table saw, they don't make that model any more.
That's too bad, it's a very good saw and the fence rules.


Why is it sitting on my table saw, you ask?
Because my workshop is a nightmare and even more so now with the remodeling projects going on.
Hopefully it'll all get squared away in the next couple of weeks after the work is completed.
My underlying problem is that I hate to get rid of stuff cause when I do the very next day I need it.
But the real problem is I just need a bigger workshop, maybe like 60' x 60', 2 story, with 12' ceilings on both floors, with a separate 60'x60' warehouse for storing stuff.

Yes, I'm a dreamer....


Tuesday, August 28, 2012

0008

This is the 2nd bowl in the spalted maple series. Almost everything mentioned in the 0007 post pertains to this bowl.


The first picture, above, shows the side of the bowl where a limb had been growing and this is normally thought of as a knot.


It too has spalting and worm holes, But this has a different shape. The profile is more angular but with a slight curve and an indention at the bottom emulating a sort of pedestal effect. Alluring.


This bowl is available for purchase at my Etsy store or the Brown County Shops store.
It is 5-3/4" in diameter x 4-3/4' tall and has 4 wire burns.


In this last picture you can see the knot I mentioned above, on the right.
This bowl too has a very glass like finish consisting of 20 coats of a satin-gloss combination polyurethane and of course a coat of Old English.

This bowl is priced at $24.95.


0007

The next 2 posts are about 2 bowls I just completed this morning. The turning and finishing has been done for a few days and this morning I gave them both a good rub down with Old English polish.

These bowls are available for purchase at my Etsy store or the Brown County Shops store.


The wood for these bowls started out in life as a tree on my neighbors property some 80 years ago.
As time went by the tree became a nuisance due to it's growing size and location in relationship to the house.
Last year the owner decided it had to go and of course I volunteered to take some of the wood off of his hands.


I stacked and stored the logs outside next to the workshop and over this past winter and spring they spalted.
I cut some of the wood to lengths then mounted them in the chuck of my lathe on the first step to their final destination - your home!


As you can see in the pictures the wood is not only spalted, as indicated by the discolorations - graying and the black lines, but also has numerous worm holes. Very striking appearance.


This particular bowl is 5-1/4" in diameter x 3-1/2" tall and has 3 wire burns on the sides.
It has a very glass like finish consisting of 20 coats of a satin-gloss combination polyurethane and of course a coat of Old English.

This bowl is priced at $24.95.


Friday, August 17, 2012

2 New Bowls

OK, started 2 new bowls, both of Aspen and Mahogany.
They're glued and clamped right now.
Will pull the clamps tonight.

The one on the left is about 7" in diameter x about 3-1/2" tall.
The one on the right is about 7" in diameter x about5-1/4" tall.
Not sure of the profiles at this point but want to come up with something a little different.
The taller one may have a short pedestal on it - or maybe not.


One thing's for certain, I need to pick up some more gloss poly soon.
Have plenty of satin poly but I like the gloss better.


These 2 bowls will have steel 3" faceplates installed for mounting on the lathe.
Then I will need to reverse them in the chuck with large jaws for finishing out the bottoms.
I'll be working on these off and on for the next 2 weeks or so depending on what else is going on around here. The tall one may end up looking similar to the "Tahitian Sunrise" that sold last weekend.


Band Saw Box - Entry Level

See the purple plant in this picture?
Anyone know what it is?
It's about 7' tall with 12" long leaves.


There are a few of them growing along the south side of the workshop and upon investigation I saw it had bunches of blueberry sized berries on it, so I picked some, here's 2 bunches.


Hope they're not toxic as I had the deep magenta juice all over my hands.
Took them into the workshop and picked all the berries off and put them in a jar. Then I used a rounded stick to smoosh them into a pulp. I further smooshed them through a piece of window screen and the result was about 6 ounces of bold magenta *dye*, completely organic and I guess home made.

Couple days prior I decided to experiment with the idea of a band saw box so I grabbed a piece of 4"x4"x4" pine and milled it to 3"x3"x4" and put it on the band saw and carefully started cutting. Band saw boxes are sort of like puzzles and you have to reverse engineer the steps in your head to figure out what it is going to look like. Now keep in mind this is my first attempt at this so it's not going to be perfect but I'm going to do the best I can even though I am prepared for disaster. LOL

After it was all cut and the pieces glued together and sanded I got the idea of trying this new organic stain on it. I used a 1" foam brush and started at it and then let it dry for a few hours and I sanded it and applied a 2nd coat. I ended up applying 3 coats total and letting it sit. This is what it looked like after a few days of drying.  


I was pleased with the result of the dye, even though it appears more red than magenta in the picture, and was going to go ahead and start applying gloss polyurethane to it but got stuck on some other projects and forgot about it.


Well I went back to this little band saw box today and was stunned to see that some of the magenta dye had disappeared. Not all of it, just in some areas. In those areas the wood was sort of yellowish. What the....???
So I guess I will apply some more of this *dye* and let it dry for a few days and see what happens.

If this ends up working the way I want it to I will post pix of the completed Band Saw Box Experiment.
If it fails, well, it''ll land in the wood stove.  ;-)


Sunday, August 5, 2012

Something Different

Well we got some rain last night, finally, and that cooled it down to the early 70's today - great weather to be out in the workshop. I'm applying finish to a few bowls and thought I'd do something different on the lathe today, something I haven't done in awhile.

I'm making Mushrooms!

Started with some spalted maple I had lying around. This was a curvy branch about 6' long and I cut it into appropriate sections on the CMS (compound miter saw), then I mounted one of the sections on the lathe.


This piece is about 5-3/4" long x about 3" in diameter.
This is the most dangerous part - stripping off the bark. The bark is very fibrous and tends to come off in chunks and flies around the shop like shrapnel. Sometimes I use the faceshield if I believe it will be too dangerous. Usually the worst that happens is the spinning fibers thrash my left thumb for a few seconds before the chisel removes them.

This picture shows the spalting in the end grain.


Nice, no?
Here's a close up.


Again, the spalted areas are much softer than the non-spalted area so it can be challenging and great care must be excercised. I've turned about a hundred mushrooms over the past few years so I sort of have it down pat.


About 15 minutes later look what emerged from that rustic timber - a mushroom!
That square is about 4" tall and it will give a sense of scale. The shroom is about 5" tall.
Didn't lose much from the height but did lose some diameter due to the bark removal.


This is a close up of the spalting at the base. 

I'll apply a couple coats of poly to the shrooms I turn today and soon they will be available for purchase over at the Brown County Shops website. 

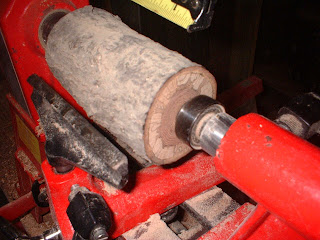
The large chunk of wood on the lathe is also spalted maple, given to me by my neighbor across the road from a tree he cut down a few years ago. It had been sitting around drying in the workshop all this time and I decided to do something with it. Maybe you'll get to see what it turns into soon!


Tuesday, July 31, 2012

Aspen with Color!

Ya know, I get out there in that workshop and the time just melts, almost like it doesn't exist. I'll be doing stuff and the next thing you know 1/2 a day has gone past.

That's what happened with the Aspen Bowl. I forgot to take pictures between the last time I posted it and now. As you can see it looks different.


Some Wood Spirits got into the workshop overnight and went hog wild with the color spectrum. I was going to make this bowl very similar to the Twilight Dream bowl that was purchased earlier this month on the Brown County Shops website. But then my wife suggested that I try to achieve a SeaFoam color instead. 

I wasn't sure what seafoam looked like so I looked it up and it seems to be variations of light green, depending. 

Here in Ruralville you can't just jump in your ride and zip down to the corner paint store and pick up what you need because the corner paint store is a couple hour round trip so I had to improvise.


I started with some dark blue water soluble wood dye from Klingspor's and I diluted it greatly with water.

Then I added some yellow latex paint with turned it green. 

Then I added some silver glaze and some soldier blue paint and shook it well. Violin! This is what it ended up as.


I liberally applied the home made concoction with a brush after I covered the lathe bed ways with a newspaper and let it dry for a few hours. 

The dye raised the grain so I lightly sanded the whole thing with 120-400 grit Abranet. Wiped it down with a dry cloth and applied another coat of the dye. I let that dry and lightly sanded again and wiped it down. 

Then I applied 2 coats of spray polyurethane with light scuffing with 0000 steel wool after each coat. Then I applied 4 coats of regular gloss poly with a Purdy brush. 

I'll give it a couple more coats of poly with light sanding in between and then the real fun begins.....